Keihin FCR-MX Install
Suzuki DR650SE 96-2008
(Use your browser's back button to return to this page after viewing link details)
Oh yeah, you want this! Turn that anemic DR into a fire breather by pitching the BST40 Mikuni CV carb and replace it with Keihin's much revered FCR-MX series carb. The stock BST suffers from all of the normal vacuum operated slide carb complaints like surging, anemic throttle response and poor flow. The DR650 is a torque engine. It is not designed to scream like the latest hot rod four strokes. The ignition system's rev limiter limits the amount of top end this bike will ever produce so why not take advantage of the grunt this bike is capable of producing? For all of the above reasons I selected the 39mm FCR-MX.
Yeah, I know you want a 41 right? Wrong! At the bare minimum this 39mm FCR blows away the BST40 in flow just by the fact that it doesn't have a butterfly valve and shaft sitting smack in the middle of the flow path after the slide.... add to that the superior technology in just about every other aspect of the FCR-MX's design and the BST is in the dust cloud miles back. Just by size alone the 39mm carb increases the air/fuel velocity at lower engine speeds which takes advantage of the DR's strong part of the power band..... but the FCR-MX has a floating slide seal that further enhances low end carburetion. IMHO the 41 would hack into the most productive part of the DR's power band while providing little if any additional top end and I proved that in my dyno testing. The bottom line is the stock DR engine just doesn't need any more flow than the 39 FCR can provide.
Cool things like multiple venting points, acclerator pump with sealed actuator shaft, large capacity float bowl with jet baffling, completely enclosed throttle cam system, and an air cut valve to reduce lean decel popping further drives the stake into the heart of the stock BST. OK so I've talked you into it right? :-)
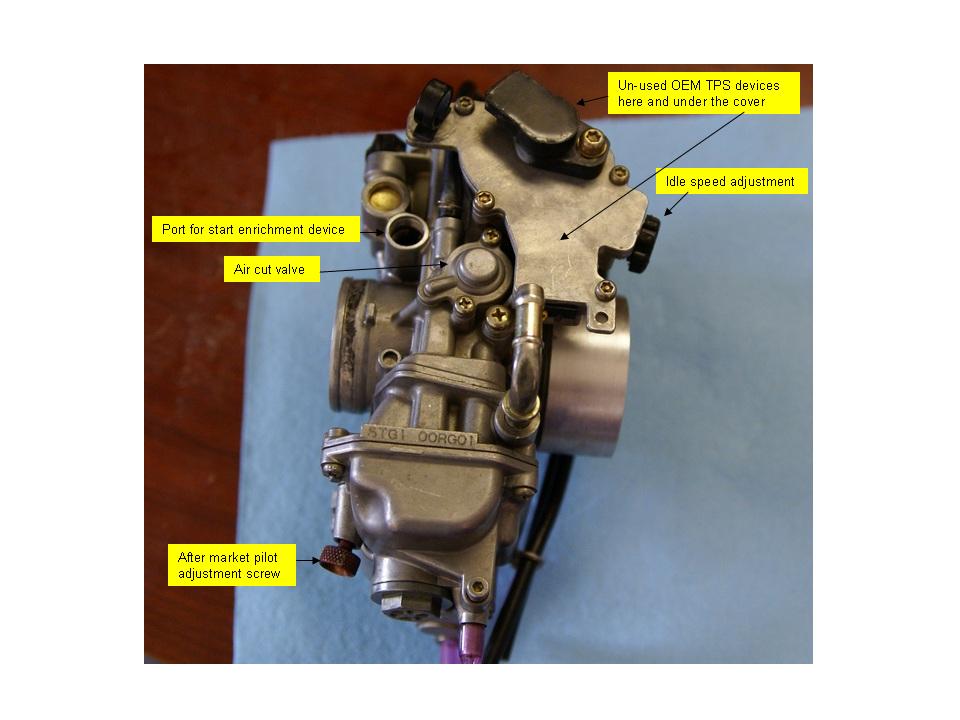
I picked up a used OEM Keihin FCR-MX off of a Yamaha YFZ450 four wheeler (04 thru 07 will work). This carb is a 39mm and has the air cut valve that I wanted. It comes with a TPS block on the left side and the idle speed adjustment is on the back side of this block which puts it in a easy to get to location when mounted on the DR. The TPS block is not removable without major hoop jumping and parts buying based on the tour I took of it... so it stays. I wanted to use as many stock components as I could so that the least amount of rigging and parts scrounging would be required.
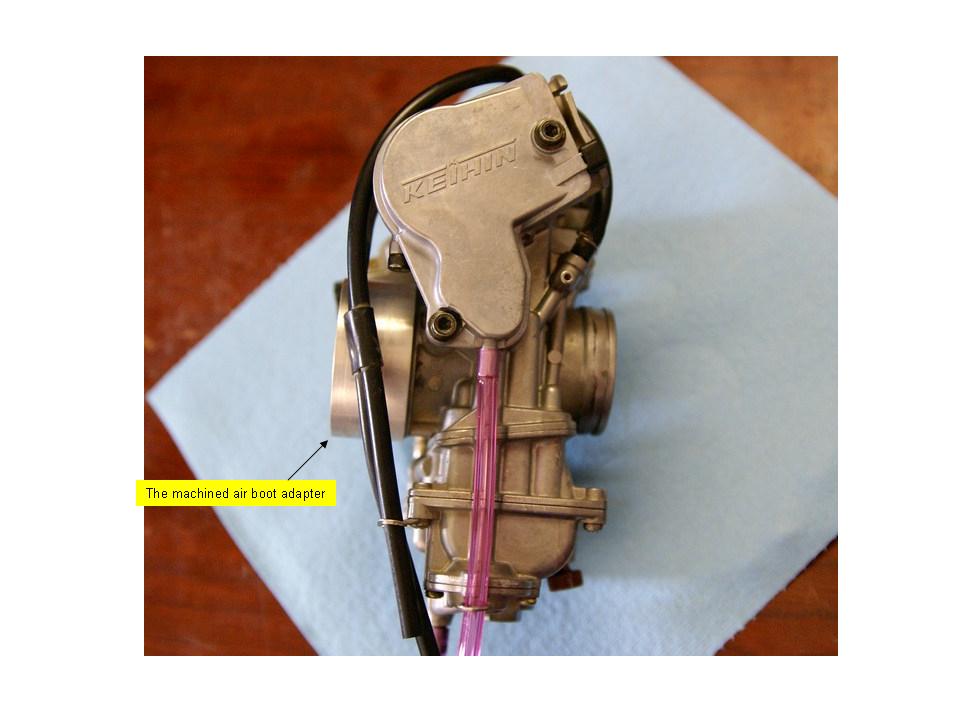
I had to make the FCR-MX occupy the same space between the stock rubber intake manifold and the air boot that the BST did. This required an aluminum sleeve to extend the air horn on the FCR-MX. I had it machined and then had to remove the lip that is on back edge the YFZ's FCR air horn for the air boot attachment point. Once the lip is removed the sleeve slides over the back of the FCR's air horn and steps up to the size of the DR650's stock air boot. I used JB Weld to attach and seal the adapter sleeve. Machined sizes for the sleeve are 54.5mm ID x 58.5mm OD x 26mm long. A nice chamfer on the ID at the back finished the sleeve.
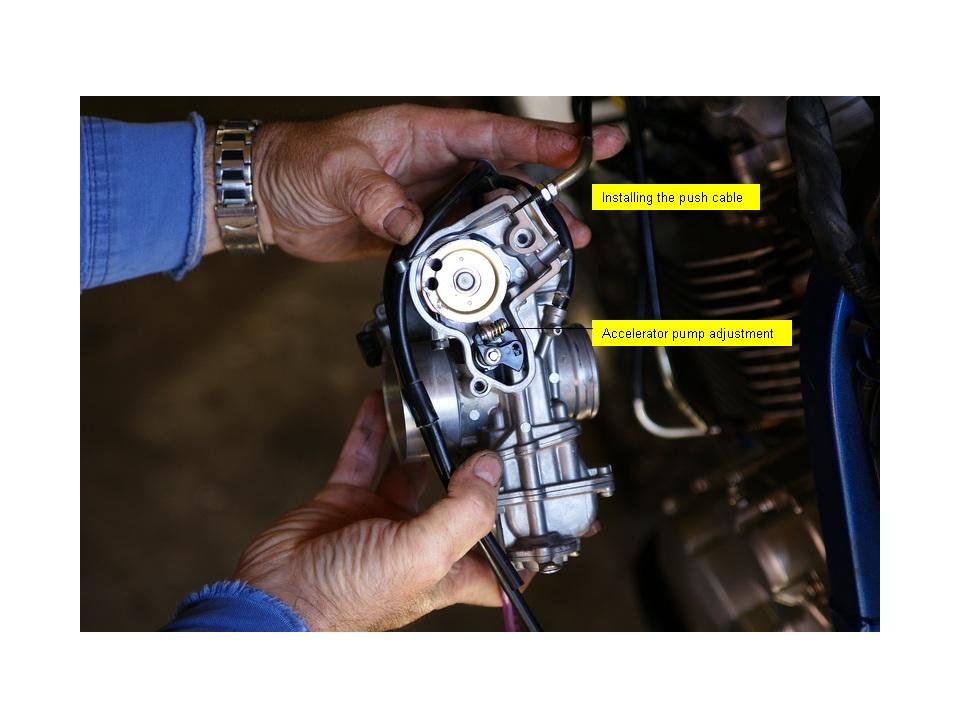
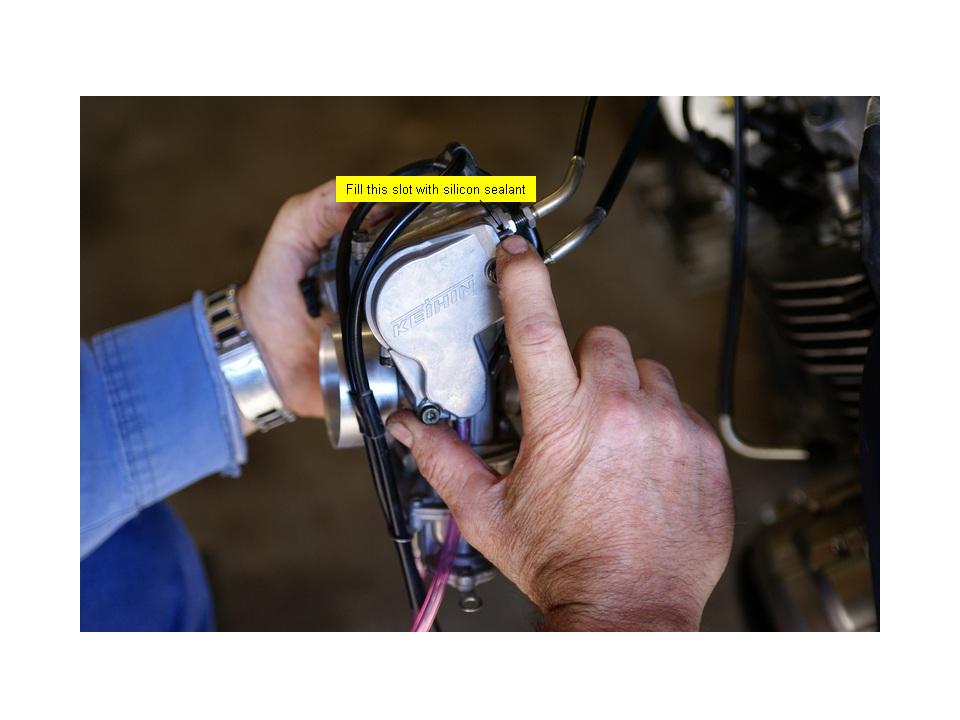
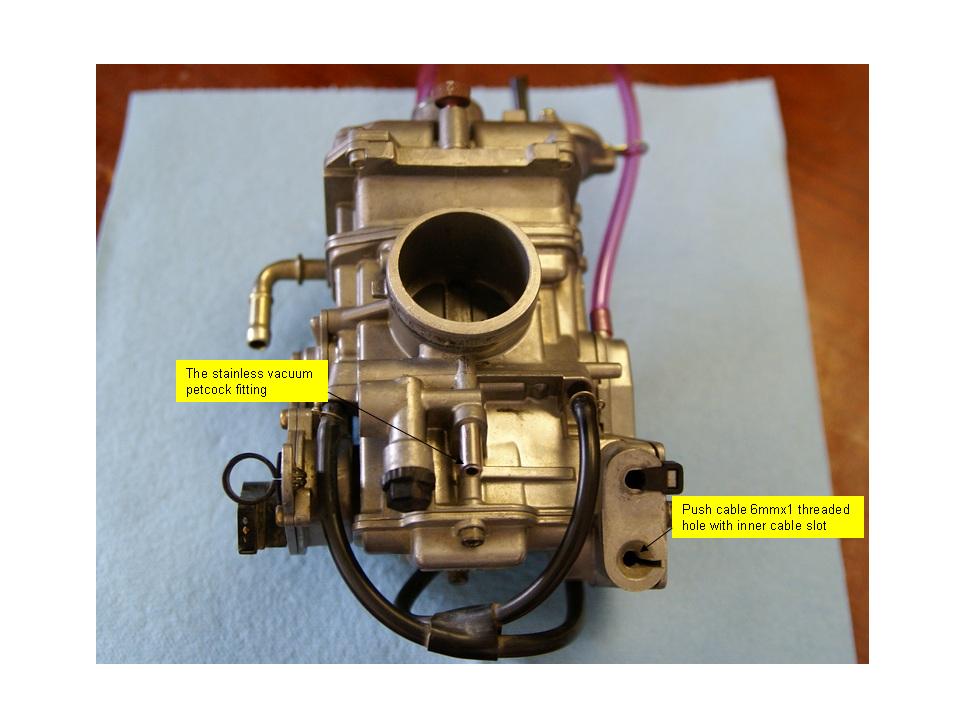
Next was making all the stock DR650 throttle cables work with the FCR-MX. It required the blank push cable mounting casting to be drilled and tapped to fit the DR's push cable curve. (The YFZ450's FCR does not use a push cable) This actually worked out well as the inner cable would have been too long had the casting already been set-up for the two nut slide in clamp system normally used like what is on the pull cable. The push/pull cam is already installed in the YFZ's FCR. I just had to drill a #10 hole and tap it to 6mmx1 thread. Then cut a slot in the side for the inner cable to slip through with a thin cut off wheel. This leaves a little gap at the top of the carb that could allow water or other crud to get into the sealed cam so I had to do this.
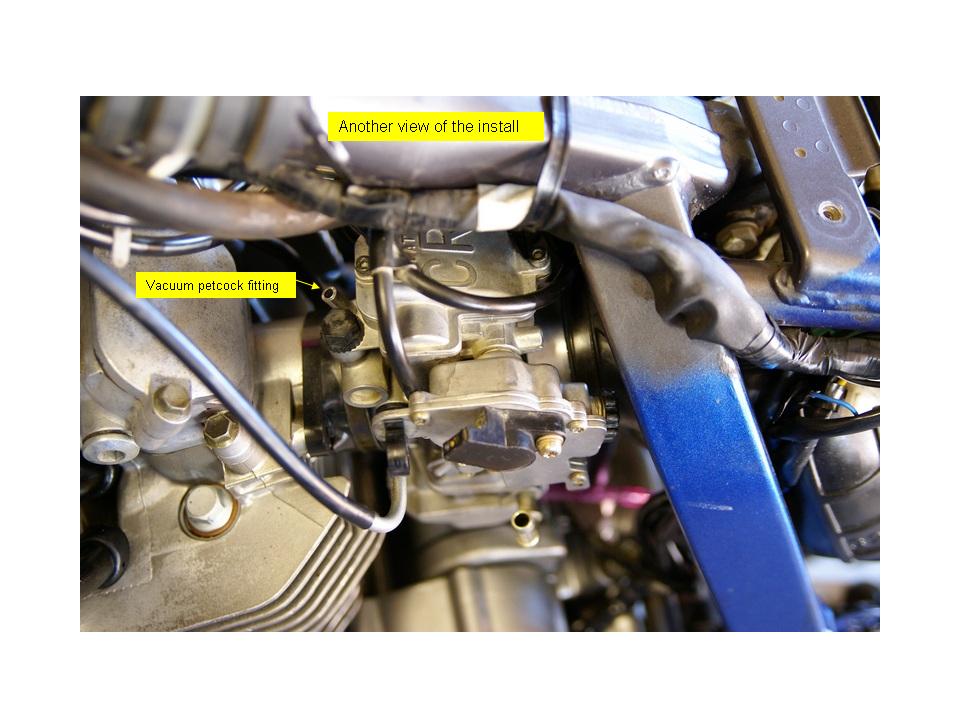
The other adaptation issue I faced was the OEM vacuum petcock on the DR650. I knew some people would want to retain it's services but I needed a vacuum source. This is what I came up with and it works perfect. This boss on the FCR had a staked brass plug. I flattened the rounded end of the plug and center drilled it with progressively larger drills until the plug loosened and spun out. I drilled the port very carefully with a #3 drill just far enough to provide enough space to tap a 1/4-28 threaded hole with a plug tap, do not drill too far! I used a piece of 1/4" stainless steel tube and threaded one end. Installed with red locktite it is now a permanent part of the carb. Another view.
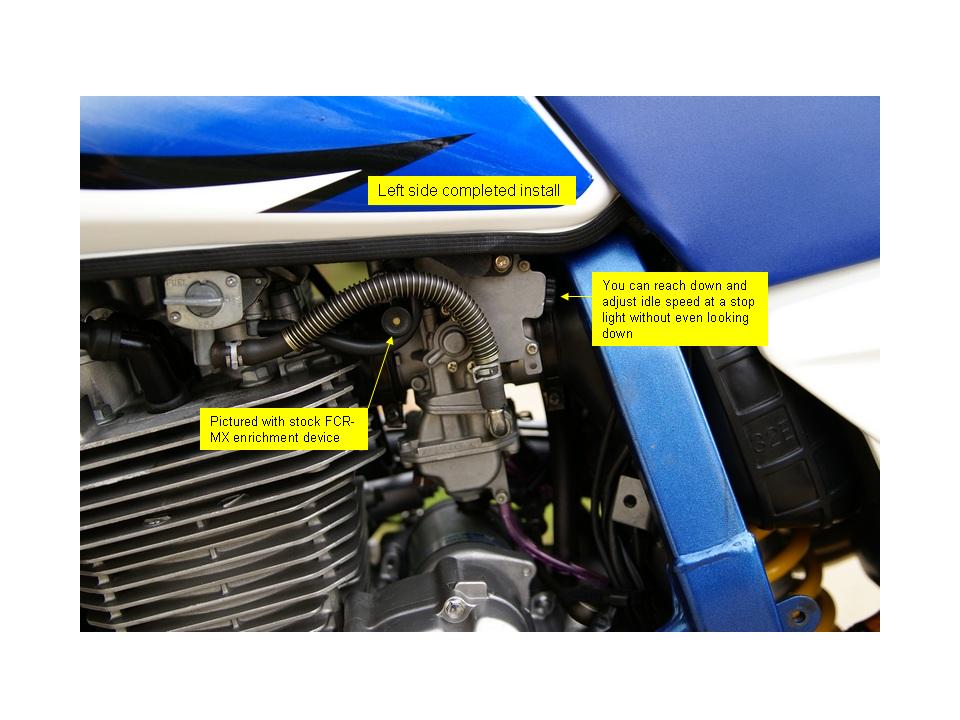
That ends the adaptation process. So let's install it! Left view installed. How cool is that? Pay no attention to the little blue ty-wrap holding the stock choke cable straight since I broke off the cheesy plastic stock Mikuni cable guide. Arrgh! They are know to be delicate. $#@!*^% Right view installed.
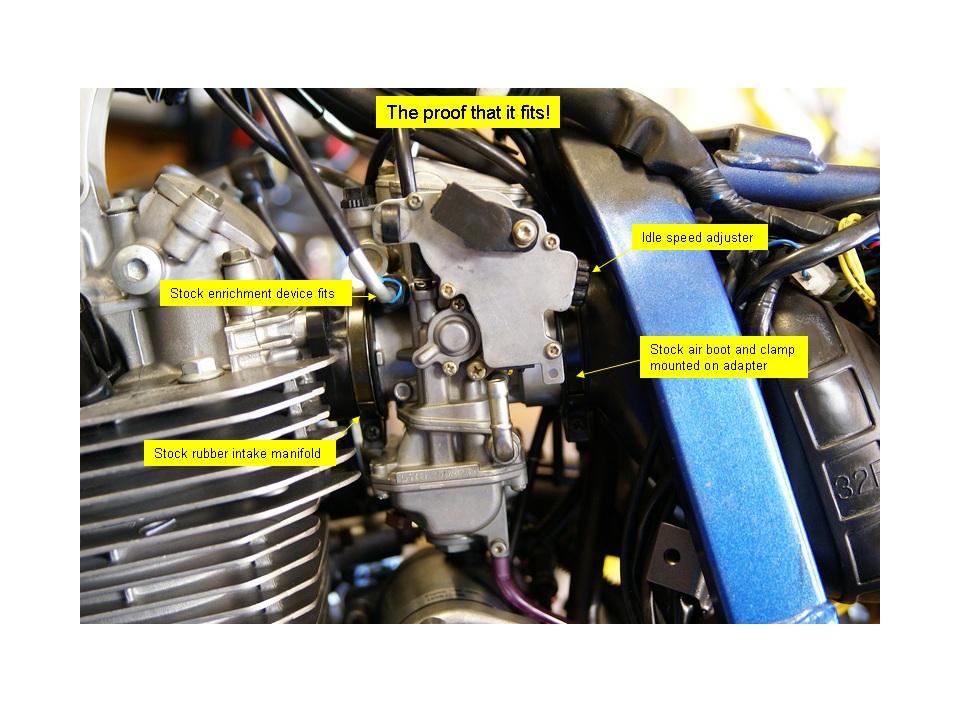
Proof that it fits: Finished view left. Finished view right.
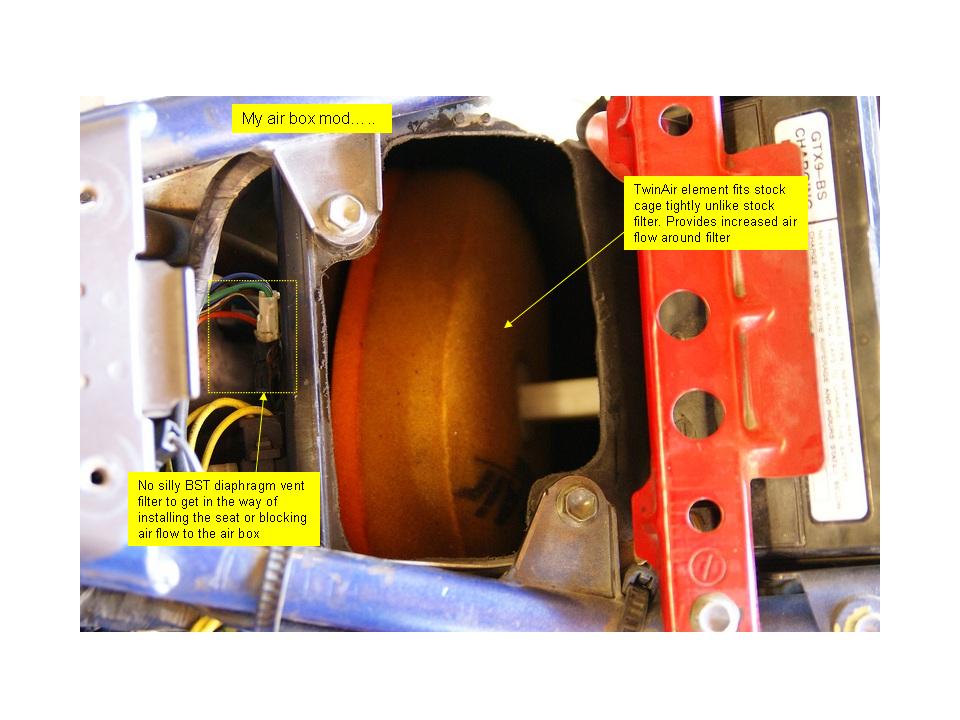
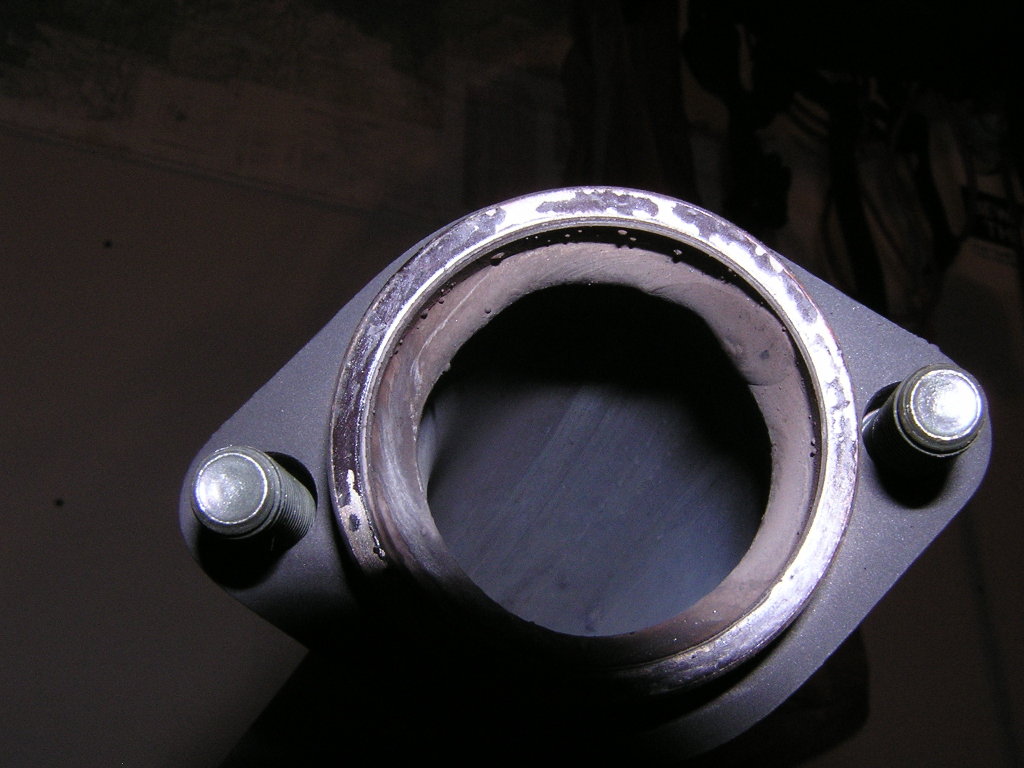
Even at it's infancy this carb flat out and hands down smokes the BST in every way! The engine will pull right down to counting thumps and accelerate away smoothly. Not a hiccup or hesitation anywhere. It has freight train torque and no surging of any kind. Of course to take advantage of the massive air flow capability you need to do this to your air box or remove the side cover. I highly recommend the box mod as the noise of the air box with the side cover removed will drive you bonkers! It's stupidly loud and annoying at any speed IMO. It's also very easy to get water in it and the filter gets dirty much faster... so don't do it! You'll also want to remove this little jewel from the head pipe flange! Sheesh. Picture courtesy of Thumpertalk DR forum member cashneno.
You also must also increase AP cam follower spring pressure with this jetting. The old o-ring mod is one way to do it but it sucks IMHO so do it right with my preferred method... the Merge Racing APS Spring. This is a much more controlled and reliable way to improve AP squirt. O-rings can stretch out loosing tension and even break.
Here is the procedure to install the Merge APS Spring.
You must check and adjust AP timing after changing the leak jet and installing the Merge racing APS Spring!
Here's how:
With the carb removed from the bike attach a long hose to your gas tank and attach it to the carb. Turn the petcock to prime. Sit on the floor next to the bike so the fuel fills the carb. I do this with the throttle cables removed. Make sure to have a clean dry towel handy right next to you within reach to dry off the back of the slide. Twist the throttle cam a few times to make sure all the air is bled out of the AP pump. Remember fuel will be shooting out of the front of the carb as you are testing. You could stuff a rag in the front but just make sure it’s not affecting the test procedure by bouncing back onto the slide somehow. Be sure to hold the carb as level as possible.
Dry the back of the slide off completely after each twist of the throttle so you can see if fuel hits it. Once the slide is wet it is hard to tell if fuel hits it again. The fuel hits the right corner of the slide cut away arc (if it’s hitting it at all that is). The goal is to have the fuel just miss the slide. If you are going to err lean towards the fuel just barely catching the corner of the slide in lieu of missing it by too much. Adjust the timing screw on the throttle cam to make corrections as required.
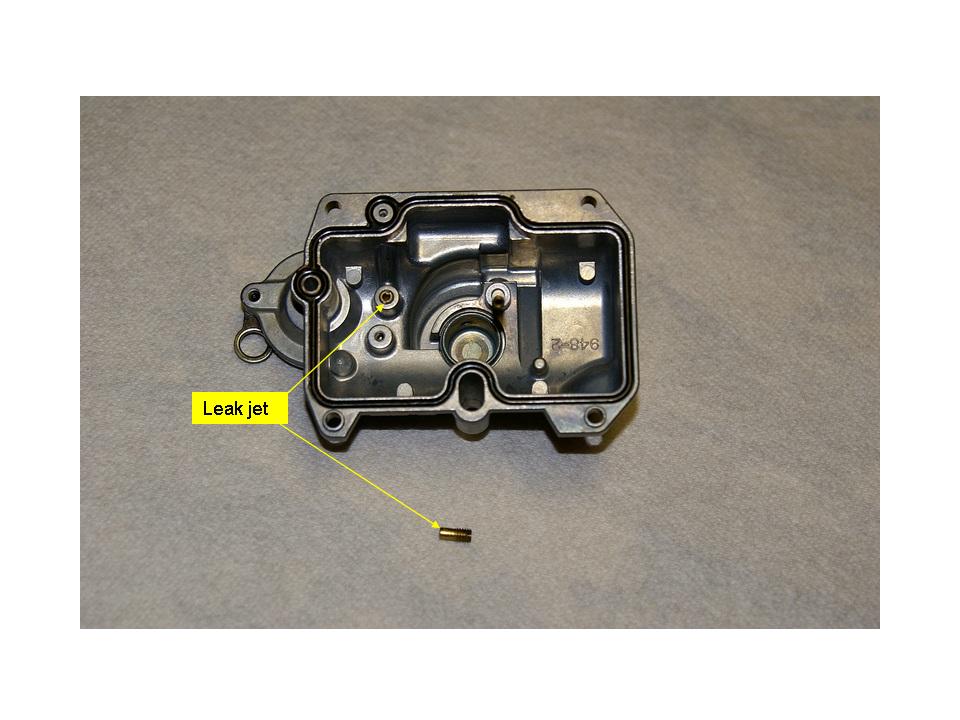
04/12/08 Jetting update: Dyno testing is done! 155 main jet, EMP-5 jet needle, 40 pilot jet, DeZine extended pilot screw @ 2 turns out +/- for your bike, OEM 100 pilot air jet, 200 main air jet (fixed size on the YFZ450 FCR-MX), #35 leak jet, Merge Racing APS Spring. This is for sea level with the FMF-Q2 or the GSXR exhaust system.
03/08/09 OEM KTM Carb Update: With the demise of the carb on KTM's in favor of FI there were some brand new OEM 39mm FCR-MX's spec'd out for the KTM450/525 floating around. This link takes you to my Thumpertalk FCR post and the update info for this carb. (Use your browser back button to return to my site)
Detailed carb installation instructions are here!
I can provide a complete modded carb or do the mods on your carb for you.
Many thanks have to go out to Chad at Sudco for the help with answering a zillion questions and providing fitment dimensions to make me realize the FCR-MX would fit. I'm a regular on Thumpertalk's DR forum. Drop in and check out a great bunch of helpful riders and more yatter concerning the install then you have time to read. ;-)
Questions, comments or help? Contact me!
© mx_rob 2009